
Debian 11
Debian 11(代号 Bullseye )是一款自由、稳定、安全的操作系统,适用于用户、开发者和企业环境。以完美的易用性和稳定性而著称,Debian 11 通过平滑的软件包和发行版升级过程为用户提供了卓越的体验。作为开发者首选的操作系统之一,Debian 11 支持多种硬件架构,包括 AMD64、i386、ARM、MIPS 等,且在物联网和嵌入式设备上表现卓越。拥有丰富的软件包数量和公开的错误跟踪系统,Debian 11 为开发者提供了强大的工具和支持。在企业环境中,Debian 11 以可靠性、安全性和专业的软件包维护者为特色,提供长期支持(LTS)版本和云映像,满足不同场景的需求。 Deiban 11 是一个社区驱动的项目,以其稳定性、安全性和广泛的硬件支持而备受推崇。
Jitsi
Jitsi 是一套开源项目,可轻松构建和部署安全的视频会议解决方案。核心组件包括 Jitsi Videobridge 和Jitsi Meet,支持通过互联网进行会议,同时社区中的其他项目还提供音频、拨号、录制和同时广播等功能。Jitsi Videobridge 通过将每个参与者的视频和音频传递给所有与会者,而不是首先混合它们,实现更好的质量、更低的延迟。如果您运行自己的服务,这是一种更可扩展且经济实惠的解决方案。Jitsi 与 WebRTC 兼容,这是 Web 通信的开放标准,同时提供高级视频路由支持,包括同时广播、带宽估算、可扩展视频编码等功能。此外,Jitsi 还提供适用于 Ubuntu 和 Debian 的软件包,方便安装。
Docker 方式安装 Jitsi
在 Debian 上安装 Docker 引擎
卸载旧版
在安装 Docker Engine 之前,您需要卸载所有冲突的软件包。Distro 维护者在其存储库中提供 Docker 软件包的非官方发行版。您必须先卸载这些软件包,然后才能安装正式版的 Docker Engine。
要卸载的非官方软件包有:
- docker.io
- docker-compose
- docker-doc
- podman-docker
1
for pkg in docker.io docker-doc docker-compose podman-docker containerd runc; do sudo apt-get remove $pkg; done
安装最新稳定版
方法一:使用一键脚本
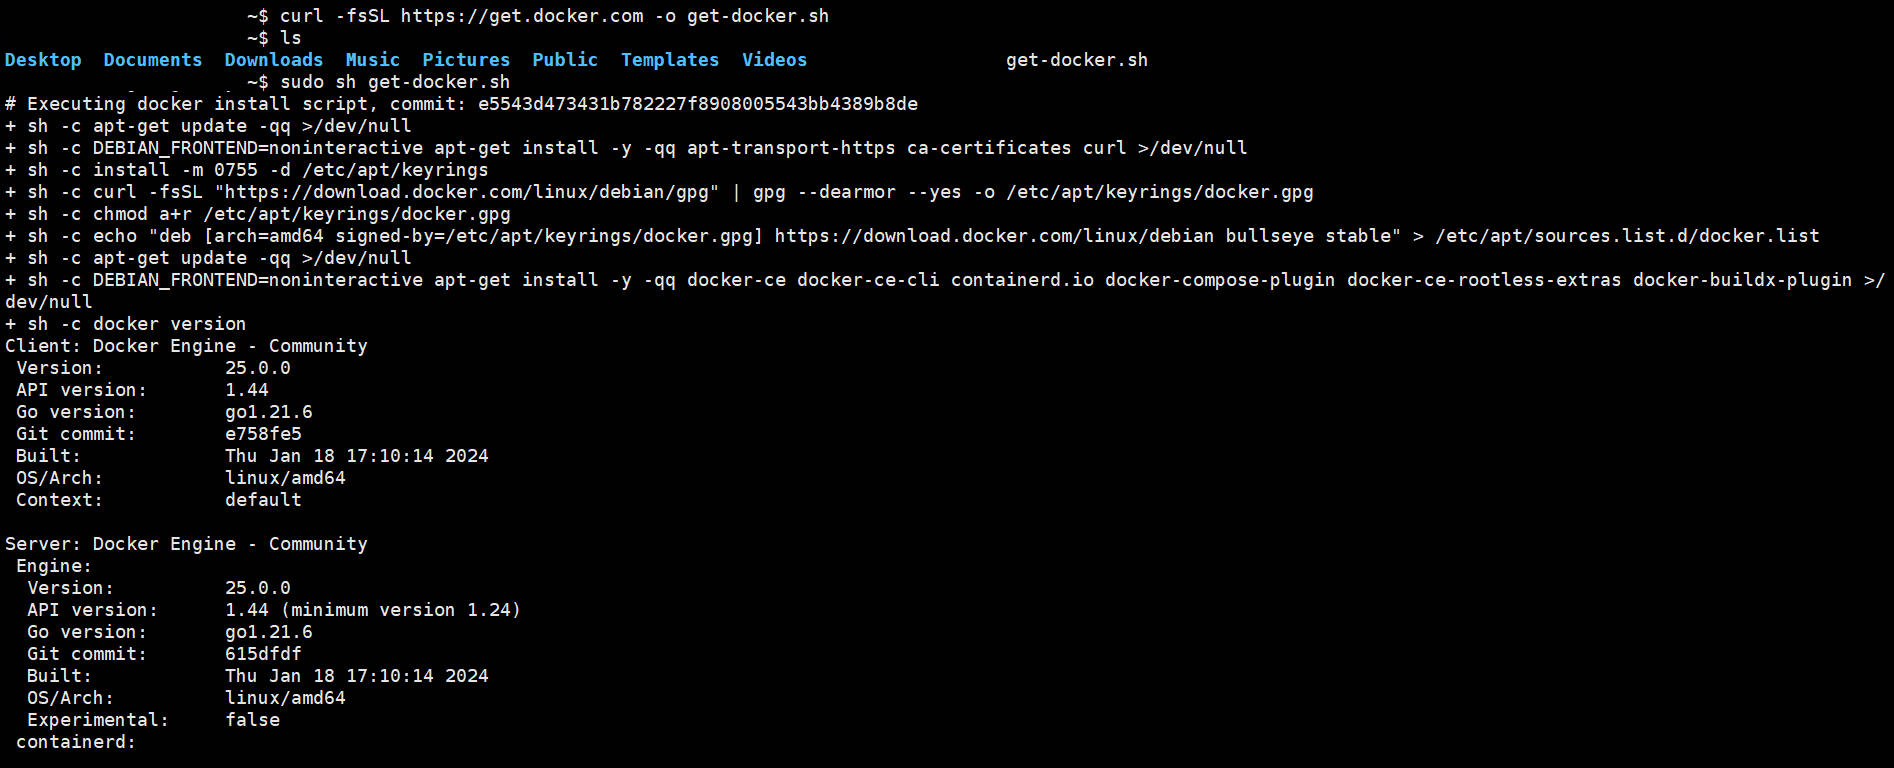
1
2
curl -fsSL https://get.docker.com -o get-docker.sh
sudo sh ./get-docker.sh --dry-run
![]() — 方法二:使用
— 方法二:使用 apt存储库安装首先,设置 Docker 的
apt存储库。1 2 3 4 5 6 7 8 9 10 11 12 13
# Add Docker's official GPG key: sudo apt-get update sudo apt-get install ca-certificates curl gnupg sudo install -m 0755 -d /etc/apt/keyrings curl -fsSL https://download.docker.com/linux/debian/gpg | sudo gpg --dearmor -o /etc/apt/keyrings/docker.gpg sudo chmod a+r /etc/apt/keyrings/docker.gpg # Add the repository to Apt sources: echo \ "deb [arch=$(dpkg --print-architecture) signed-by=/etc/apt/keyrings/docker.gpg] https://download.docker.com/linux/debian \ $(. /etc/os-release && echo "$VERSION_CODENAME") stable" | \ sudo tee /etc/apt/sources.list.d/docker.list > /dev/null sudo apt-get update
接着,安装最新 Docker 软件包
1
sudo apt-get install docker-ce docker-ce-cli containerd.io docker-buildx-plugin docker-compose-plugin
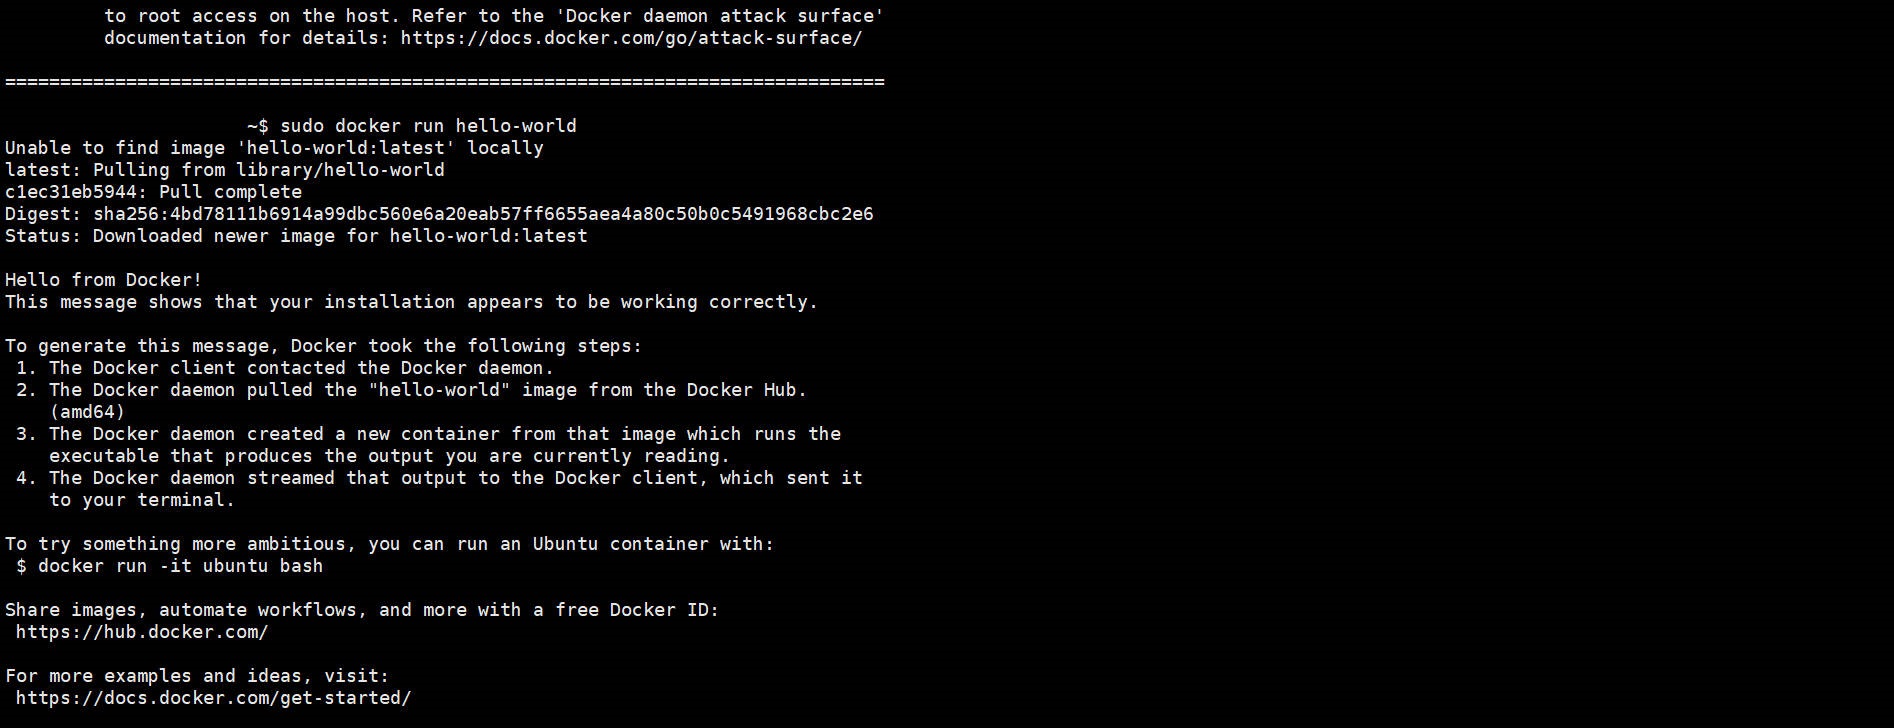
测试安装是否成功
1
sudo docker run hello-world![]()
卸载 Docker 引擎
卸载 Docker Engine、CLI、containerd 和 Docker Compose 软件包:
1
sudo apt-get purge docker-ce docker-ce-cli containerd.io docker-buildx-plugin docker-compose-plugin docker-ce-rootless-extras
主机上的映像、容器、卷或自定义配置文件不会自动删除。要删除所有映像、容器和卷:
1
2
sudo rm -rf /var/lib/docker
sudo rm -rf /var/lib/containerd
Docker 安装 Jitsi Meet
- 下载安装包
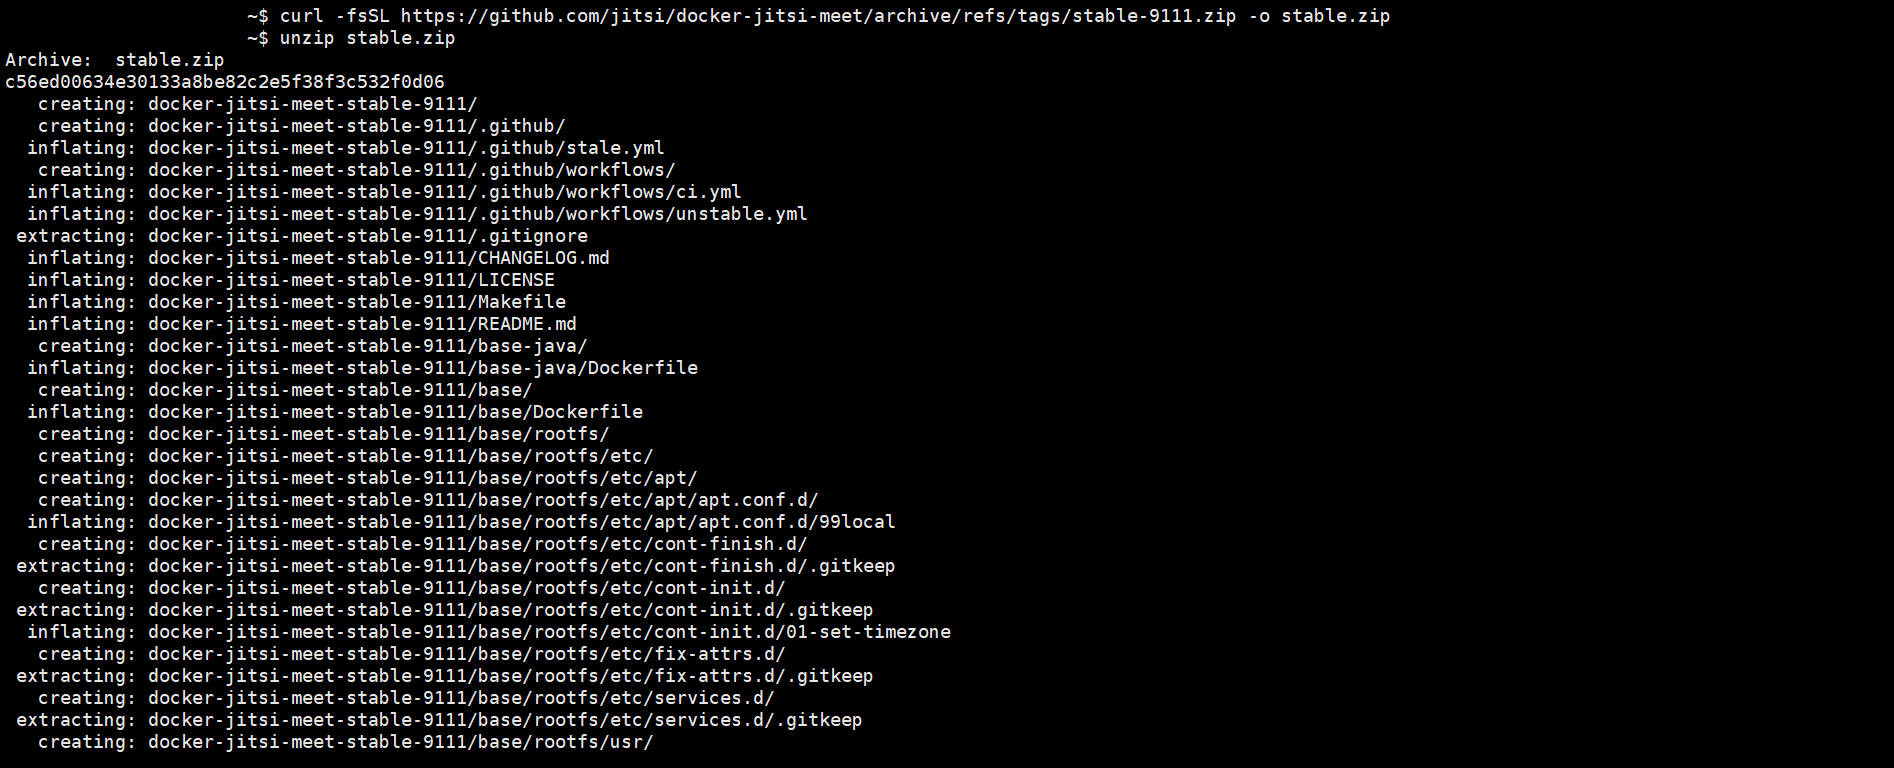
1 2 3
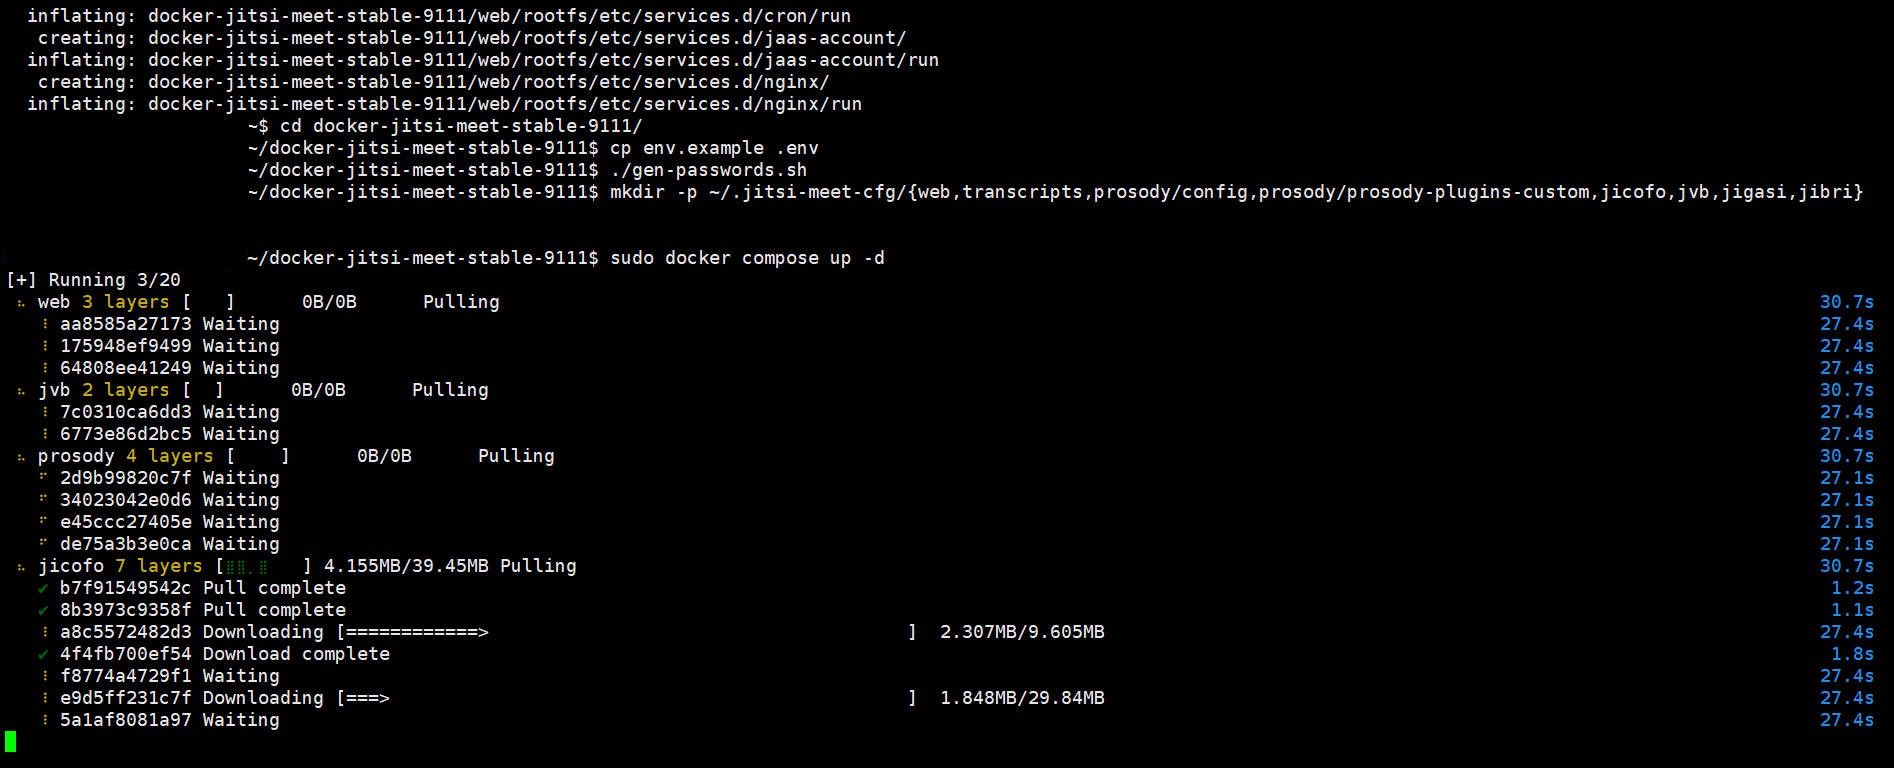
curl -fsSL https://github.com/jitsi/docker-jitsi-meet/archive/refs/tags/stable-9111.zip -o stable.zip unzip stable.zip cd docker-jitsi-meet-stable-9111
![]() 可以前往 发布页 查看更多版本的 Jitsi Meet
可以前往 发布页 查看更多版本的 Jitsi Meet - 复制配置
.env1
cp env.example .env配置有几处需要修改,建议先看下一小节的 配置介绍
- 设置强密码
1
./gen-passwords.sh
- 创建
CONFIG目录1
mkdir -p ~/.jitsi-meet-cfg/{web,transcripts,prosody/config,prosody/prosody-plugins-custom,jicofo,jvb,jigasi,jibri}
- Jitsi Meet 启动!!!
1
docker compose up -d![]() 在服务器上可以运行
在服务器上可以运行 curl https://localhost:8443 --insecure来看看,是否安装成功。![]()
如果从外部网络无法访问,可能需要配置防火墙,开放相应的端口。
Docker 配置详细解释

1
2
3
4
5
6
7
8
9
10
11
12
13
14
15
16
17
18
19
20
21
22
23
24
25
26
27
28
29
30
31
32
33
34
35
36
37
38
39
40
41
42
43
44
45
46
47
48
49
50
51
52
53
54
55
56
57
58
59
60
61
62
63
64
65
66
67
68
69
70
71
72
73
74
75
76
77
78
79
80
81
82
83
84
85
86
87
88
89
90
91
92
93
94
95
96
97
98
99
100
101
102
103
104
105
106
107
108
109
110
111
112
113
114
115
116
117
118
119
120
121
122
123
124
125
126
127
128
129
130
131
132
133
134
135
136
137
138
139
140
141
142
143
144
145
146
147
148
149
150
151
152
153
154
155
156
157
158
159
160
161
162
163
164
165
166
167
168
169
170
171
172
173
174
175
176
177
178
179
180
181
182
183
184
185
186
187
188
189
190
191
192
193
194
195
196
197
198
199
200
201
202
203
204
205
206
207
208
209
210
211
212
213
214
215
216
217
218
219
220
221
222
223
224
225
226
227
228
229
230
231
232
233
234
235
236
237
238
239
240
241
242
243
244
245
246
247
# shellcheck disable=SC2034

################################################################################
################################################################################
# Welcome to the Jitsi Meet Docker setup!
#
# This sample .env file contains some basic options to get you started.
# The full options reference can be found here:
# https://jitsi.github.io/handbook/docs/devops-guide/devops-guide-docker
################################################################################
################################################################################


#
# Basic configuration options
#

# Directory where all configuration will be stored
CONFIG=~/.jitsi-meet-cfg

# Exposed HTTP port
HTTP_PORT=80

# Exposed HTTPS port
HTTPS_PORT=443

# -------- comment
# It is recommended to enable it and force the use of HTTPS.
ENABLE_HTTP_REDIRECT=1
# -------- comment

# System time zone
TZ=UTC

# -------- comment
# PUBLIC_URL must be set, otherwise you will not be able to enter the conference room normally.
# -------- comment

# Public URL for the web service (required)
PUBLIC_URL=https://meet.example.com

# Media IP addresses to advertise by the JVB
# This setting deprecates DOCKER_HOST_ADDRESS, and supports a comma separated list of IPs
# See the "Running behind NAT or on a LAN environment" section in the Handbook:
# https://jitsi.github.io/handbook/docs/devops-guide/devops-guide-docker#running-behind-nat-or-on-a-lan-environment
#JVB_ADVERTISE_IPS=192.168.1.1,1.2.3.4


#
# JaaS Components (beta)
# https://jaas.8x8.vc
#

# Enable JaaS Components (hosted Jigasi)
# NOTE: if Let's Encrypt is enabled a JaaS account will be automatically created, using the provided email in LETSENCRYPT_EMAIL
#ENABLE_JAAS_COMPONENTS=0


#
# Let's Encrypt configuration
#

# Enable Let's Encrypt certificate generation
ENABLE_LETSENCRYPT=1

# Domain for which to generate the certificate
LETSENCRYPT_DOMAIN=meet.example.com

# E-Mail for receiving important account notifications (mandatory)
LETSENCRYPT_EMAIL=alice@atlanta.net

# -------- comment
# LETSENCRYPT_USE_STAGING can help apply for test certificates without being limited in the number of times
# -------- comment

# Use the staging server (for avoiding rate limits while testing)
LETSENCRYPT_USE_STAGING=1


#
# Etherpad integration (for document sharing)
#

# Set etherpad-lite URL in docker local network (uncomment to enable)
#ETHERPAD_URL_BASE=http://etherpad.meet.jitsi:9001

# Set etherpad-lite public URL, including /p/ pad path fragment (uncomment to enable)
#ETHERPAD_PUBLIC_URL=https://etherpad.my.domain/p/

# Name your etherpad instance!
ETHERPAD_TITLE="Video Chat"

# The default text of a pad
ETHERPAD_DEFAULT_PAD_TEXT="Welcome to Web Chat!\n\n"

# Name of the skin for etherpad
ETHERPAD_SKIN_NAME=colibris

# Skin variants for etherpad
ETHERPAD_SKIN_VARIANTS="super-light-toolbar super-light-editor light-background full-width-editor"


#
# Basic Jigasi configuration options (needed for SIP gateway support)
#

# SIP URI for incoming / outgoing calls
#JIGASI_SIP_URI=test@sip2sip.info

# Password for the specified SIP account as a clear text
#JIGASI_SIP_PASSWORD=passw0rd

# SIP server (use the SIP account domain if in doubt)
#JIGASI_SIP_SERVER=sip2sip.info

# SIP server port
#JIGASI_SIP_PORT=5060

# SIP server transport
#JIGASI_SIP_TRANSPORT=UDP

# -------- comment
# ENABLE_AUTH and ENABLE_GUESTS are turned on at the same time. When you are the host, you can directly send the meeting link to the guests.
# -------- comment

#
# Authentication configuration (see handbook for details)
#

# Enable authentication
ENABLE_AUTH=1

# Enable guest access
ENABLE_GUESTS=1

# Select authentication type: internal, jwt, ldap or matrix
AUTH_TYPE=jwt

# JWT authentication
#

# -------- comment
# set JWT_APP_ID with python
# import uuid
# uuid.uuid4()
# -------- comment

# Application identifier
JWT_APP_ID=faf5ce4a-47ac-4d42-b714-d64c8b49a5c5

# -------- comment
# set JWT_APP_SECRET with python
# import secrets
# secrets.token_hex(32)
# secrets.token_urlsafe(32)
# -------- comment

# Application secret known only to your token generator
JWT_APP_SECRET=JUQ39rC-sCAR7VFtyEhcNl-q217ru_Szi8BDJbQoSv0

# (Optional) Set asap_accepted_issuers as a comma separated list
#JWT_ACCEPTED_ISSUERS=my_web_client,my_app_client

# (Optional) Set asap_accepted_audiences as a comma separated list
#JWT_ACCEPTED_AUDIENCES=my_server1,my_server2

# LDAP authentication (for more information see the Cyrus SASL saslauthd.conf man page)
#

# LDAP url for connection
#LDAP_URL=ldaps://ldap.domain.com/

# LDAP base DN. Can be empty
#LDAP_BASE=DC=example,DC=domain,DC=com

# LDAP user DN. Do not specify this parameter for the anonymous bind
#LDAP_BINDDN=CN=binduser,OU=users,DC=example,DC=domain,DC=com

# LDAP user password. Do not specify this parameter for the anonymous bind
#LDAP_BINDPW=LdapUserPassw0rd

# LDAP filter. Tokens example:
# %1-9 - if the input key is user@mail.domain.com, then %1 is com, %2 is domain and %3 is mail
# %s - %s is replaced by the complete service string
# %r - %r is replaced by the complete realm string
#LDAP_FILTER=(sAMAccountName=%u)

# LDAP authentication method
#LDAP_AUTH_METHOD=bind

# LDAP version
#LDAP_VERSION=3

# LDAP TLS using
#LDAP_USE_TLS=1

# List of SSL/TLS ciphers to allow
#LDAP_TLS_CIPHERS=SECURE256:SECURE128:!AES-128-CBC:!ARCFOUR-128:!CAMELLIA-128-CBC:!3DES-CBC:!CAMELLIA-128-CBC

# Require and verify server certificate
#LDAP_TLS_CHECK_PEER=1

# Path to CA cert file. Used when server certificate verify is enabled
#LDAP_TLS_CACERT_FILE=/etc/ssl/certs/ca-certificates.crt

# Path to CA certs directory. Used when server certificate verify is enabled
#LDAP_TLS_CACERT_DIR=/etc/ssl/certs

# Wether to use starttls, implies LDAPv3 and requires ldap:// instead of ldaps://
# LDAP_START_TLS=1


#
# Security
#
# Set these to strong passwords to avoid intruders from impersonating a service account
# The service(s) won't start unless these are specified
# Running ./gen-passwords.sh will update .env with strong passwords
# You may skip the Jigasi and Jibri passwords if you are not using those
# DO NOT reuse passwords
#

# XMPP password for Jicofo client connections
JICOFO_AUTH_PASSWORD=

# XMPP password for JVB client connections
JVB_AUTH_PASSWORD=

# XMPP password for Jigasi MUC client connections
JIGASI_XMPP_PASSWORD=

# XMPP recorder password for Jibri client connections
JIBRI_RECORDER_PASSWORD=

# XMPP password for Jibri client connections
JIBRI_XMPP_PASSWORD=

#
# Docker Compose options
#

# Container restart policy
#RESTART_POLICY=unless-stopped

# Jitsi image version (useful for local development)
#JITSI_IMAGE_VERSION=latest