
刚开始写GitHub Pages,不知道怎么写目录,生成多个静态页。发现GitHub Pages用的是Jekyll编译的。为了方便写好GitHub Pages,在的win10上尝试安装了一把Jekyll。
准备工作
- RubyInstaller
只需要下载RubyInstaller这一个工具就足够了。下载页面有很多版本,对于新手不知道该如何选择,这时候可以选择高亮标记的那个版本,我下载的是Ruby+Devkit 2.5.3-1 (x64)。
安装过程
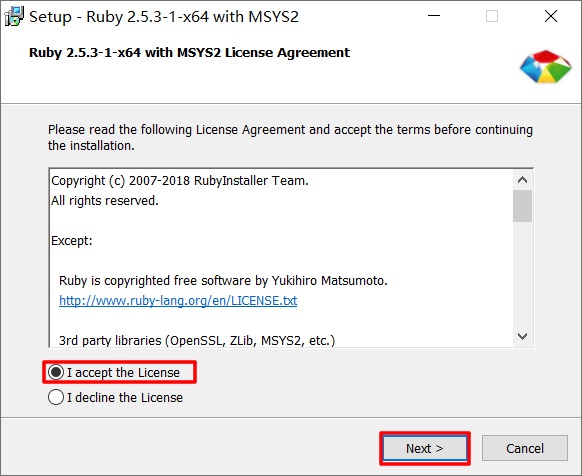
1.接受协议,并点下一步
2.选择安装路径,勾选使用utf-8作为默认解码方式,点安装

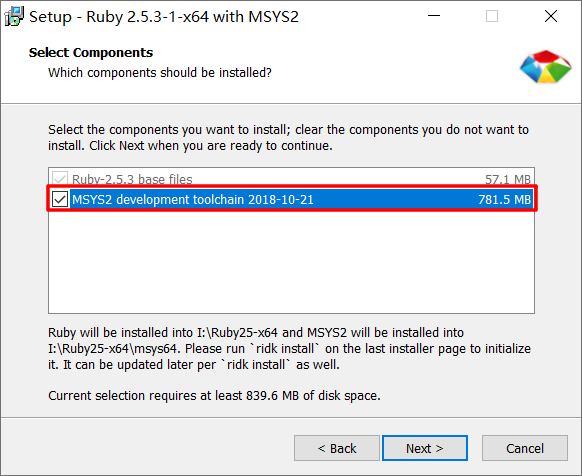
3.勾选MSYS2 development ,点下一步
4.稍等片刻,等待安装完成

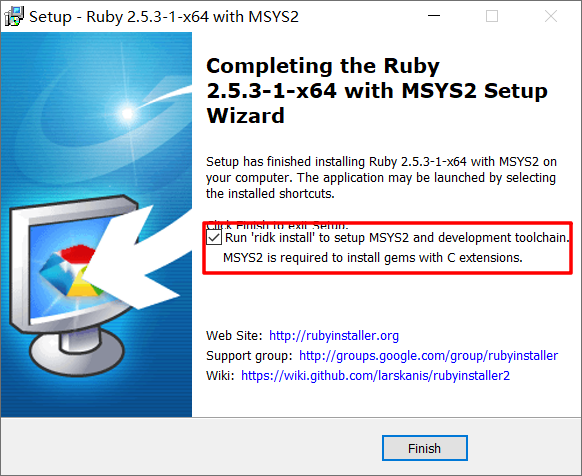
5.选中复选框,进行MSYS2的安装,点完成
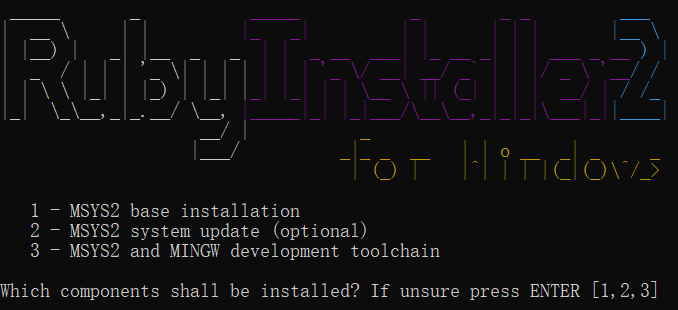
6.在弹出的命令行对话框里输入3并回车,如果输入1会导致后面的Jekyll编译失败
7.新开一个命令行窗口,输入
1
gem install jekyll bundler
8.等待一会儿之后,会收到 26 gems installed 的提示,接着输入
1
jekyll -v
如果得到 jekyll 3.8.5 的提示,说明成功安装了Jekyll。
快速开始
1.在./myblog 目录创建一个新的Jekyll站点,运行
1
jekyll new myblog
2.进入新目录
1
cd myblog
3.构建站点并使其在本地服务器上可用
1
bundle exec jekyll serve
4.访问http://localhost:4000试试
配置介绍
配置文件_config.yml每次修改之后需要重启启动服务
1
2
3
4
5
6
7
8
9
10
11
12
13
14
15
16
17
title: Your awesome title
email: your-email@example.com
description: >- # this means to ignore newlines until "baseurl:"
  Write an awesome description for your new site here. You can edit this
  line in _config.yml. It will appear in your document head meta (for
  Google search results) and in your feed.xml site description.
baseurl: "" # the subpath of your site, e.g. /blog
url: "" # the base hostname & protocol for your site, e.g. http://example.com
twitter_username: jekyllrb
github_username:  jekyll

# Build settings
markdown: kramdown
theme: minima
plugins:
  - jekyll-feed
title 是网站标题,email是网页底部的邮件联系方式,description是一段网站的简要描述,baseurl是网站的子目录,没有特别需要留空就可以。url是网址,留空就可以。twitter_username和github_username也是联系方式,这些联系方式不想留的话可以直接将对应的配置项注释掉。
将写好的md文件,放入根目录下的_posts目录,启动服务时,这里的md文件会被编译成html网页。简单说下里面的配置。在md文件的最开始有一些配置
1
2
3
4
5
6
---
layout: post
title:  "在win10上安装jekyll"
date:   2019-03-18 17:48:38 +0800
categories: Post
---
layout是网页的布局,title是网页的标题,date是写文章的时间,categories是类别,它与生成的url有关。
简单地将Jekyll配置到了电脑上,完善自己的博客,继续发掘它的更多功能ing…